Overview #
Introduction: The SelectaDock I is a robust docking station designed to enhance the expansion capabilities of compatible ThinkPad models.
Machine Type 3547 · 1995 · 45 sections
SelectaDock I docking system.
Introduction: The SelectaDock I is a robust docking station designed to enhance the expansion capabilities of compatible ThinkPad models.
Note: The diagnostic tests are intended to test only IBM products. Non-IBM products, prototype cards, or modified options can give false errors and invalid system responses.
Note: To run the diagnostics, refer to 'How to Run the Diagnostics'.
Use the following procedure as a guide for computer problems.
NOTE: The diagnostic tests are intended to test only IBM products. Non-IBM products, prototype cards, or modified options can give false errors and invalid system responses.
 When the Problem Determination Procedure in the operation manual
that is supplied with the adapter or device says
“Have the system unit serviced“,
this means the computer and SelectaDock Docking System.
When the Problem Determination Procedure in the operation manual
that is supplied with the adapter or device says
“Have the system unit serviced“,
this means the computer and SelectaDock Docking System.
Obtain the failing symptoms in as much detail as possible.- Verify the symptoms by attempting to recreate the failure by running the diagnostic test or by repeating the same operation.
NOTE: To run the diagnostics, refer to 'How to Run the Diagnostics'.
| Symptoms (Verified) | Go to |
|---|---|
| Power failure. (The power indicator does not go on or stay on.) | 'Power Supply'. |
| POST does not complete. No beeps/error code are indicated. | 'Symptom-to-FRU Index', and then use the 'No Beep Symptoms' table. |
| POST beeps, but no error codes are displayed. | 'Symptom-to-FRU Index', and then use the 'Beep Symptoms' table. |
| POST detected an error and displayed numeric error codes. | 'Symptom-to-FRU Index', and then use the 'Numeric Error Codes' table. |
| The diagnostic test detected an error and displayed an FRU code. | 'Diagnostic Error Codes'. |
| The configuration is not the same as the installed devices. | 'Checking the Installed Devices List'. |
| Other symptoms (such as LCD display problems) | 'Symptom-to-FRU Index', and then use the other symptom table. |
| Symptoms cannot be recreated. (Intermittent problems) | Use the customer reported symptoms and go to 'Symptom-to-FRU Index'. |
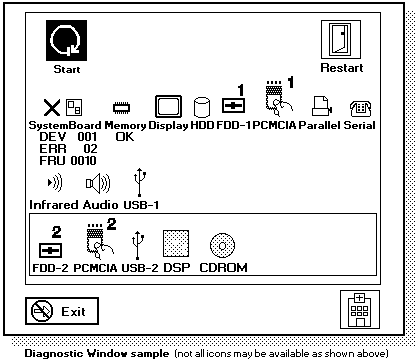
Use either the TrackPoint III or the cursor move keys to interact with the tests. The Enter key works the same as selecting the OK icon to reply OK.
          A **OK** mark appears beside the selected devices.
         - Select **OK** and press Enter
            if the selection is OK.- Select a device and press Enter to start the tests.- Select **Test All** to test all devices.- Select **Loop Test** to run the tests in a repeated loop.

                  A loop option menu appears in which a device loop or all-device
                  loop can be selected.
                  Select a device and press the **Spacebar** to select
                  a device. Repeat this step to select multiple devices.
                  Press Enter to start the diagnostic loop. If no device is selected,
                  all device tests are looped.- To exit the loop,
                    keep pressing **Ctrl+Pause** until the test exits.
                    A beep sounds to notify
                    that the exit interrupt is sensed
                    by the test program.
The SelectaDock Docking System Options Diskette helps you troubleshoot the expansion unit, SCSI adapter, and SCSI device problems through a series of menus.
Run the diagnostics after you have completed the installation of the SelectaDock Docking System and SCSI devices to verify these devices work correctly. Do the following:
Note: Replace the FRUs one at a time in the sequence shown in the FRUs of the SelectaDock Docking System Sequence of Action column. If a replaced part did not resolve the problem, put the original part back in the SelectaDock Docking System. *Do not replace non-defective parts.*
The Symptom-to-FRU Index lists error symptoms and possible causes. The most likely cause is listed first.
NOTE: Replace the FRUs one at a time in the sequence shown in the FRUs of the SelectaDock Docking System Sequence of Action column. If a replaced part did not resolve the problem, put the original part back in the SelectaDock Docking System. Do not replace non-defective parts.
Always begin with 'General Preparation' This index also can be used to help you decide which FRUs to have available when servicing the SelectaDock Docking System.
Numeric error codes show the errors detected in the POST or system operation. Xs, when included in the error code, can be any number.
FRU codes are used for errors detected by diagnostic tests.
If no error codes are available, use narrative symptoms.
If the symptom is not listed or you cannot correct the problem using this index, go to 'Undetermined Problems'.
If you cannot correct the problem using this index, go to 'Undetermined Problems'.
| Symptom/Error | SelectaDock Docking System |
|---|---|
| FRUs Sequence of Actions | |
| 10X, 11X | 1. Adapter in slot (if used) |
| 101: Interrupt failure. | 2. Riser card |
| 102: Timer failure. | 3. Main card |
| 103: Timer interrupt failure. | |
| 104.: Protected mode failure. | |
| 105: Last 8042 command not accepted. | |
| 107: NMI test failure. | |
| 108: Timer bus test failure. | |
| 109: Low meg-chip select test. | |
| 195 | 1. Do the following steps. |
| (The computer was docked to the | a. Power-off and undock the system. |
| SelectaDock Docking System while | b. Power-on and shut down the system. |
| in hibernation mode.) | c. Power-off and dock the system. |
| 1XX | 1. See the Hardware Maintenance Manual |
| of the computer. | |
| If the problem remains, go to 'Undetermined Problems' | |
| 2XX | 1. See the Hardware Maintenance Manual. |
| 201: Memory data error. | of the computer. |
| 202: Memory line error 00-15. | 2. Main card |
| 203: Memory line error 16-23. | |
| 205: Memory test failure on on-board memory. | |
| 221: ROM to RAM remap error. | |
| 3XX | 1. See 'External Keyboard' |
| 6XX | 1. Before changing any devices, |
| run the diagnostic test. | |
| (See the 'How to Run the Diagnostics') | |
| 2. FDD external attachment kit | |
| 3. Diskette drive assembly | |
| 4. Riser card | |
| 11XX, 12XX | 1. Serial devices |
| 2. Communication cable | |
| 3. Riser card | |
| 17XX | 1. Hard disk drive |
| 2. Main card | |
| (2.5-inch ThinkPad hard disk drive) | |
| 24XX | 1. Main card |
| 2. Riser card | |
| 860X | 1. Mouse |
| 2. External keyboard | |
| 3. Riser card | |
| I9990301, I9990302 | 1. See the Hardware Maintenance Manual. |
| I9990305 | of the computer. |
| Not shown above | 1. See the Hardware Maintenance Manual |
| 2. See 'Undetermined Problems'. | |
| of the computer. |
If an error is detected, the following appears:
The device ID and error code are used to indicate the detail portion of the FRU which caused the error. If replacing a FRU does not correct the problem, see the device ID or error code from the previous failure. If they have changed, the cause might be because the new FRU is detective or that the FRU was incorrectly installed.
If an error is detected by the diagnostic tests, a four-digit FRU code is displayed. The FRU code indicates two suspected FRUs. Replace the FRU that is indicated by the two leftmost digits first, then replace the FRU that indicated two rightmost digits. No FRU is assigned to code 00. If only one FRU is suspected, the other FRU code is filled with zeros. See the reference page before replacing the FRU.
| FRU Code | FRU |
|---|---|
| 10 | 1. System Board |
| 30 | Reserved |
| 32 | 1. External Keyboard 2. Main Card 3. Riser Card |
| 33 | 1. External Mouse 2. Main Card 3. Riser Card |
| 45 | External CRT |
| 51 | 1. Reseat the Diskette Drive (FDD-2) 2. Diskette Drive (FDD-2) 3. Main Card 4. Riser Card |
| 61 | 1. Reseat the Hard Disk Drive in SelectaDock Docking System (HDD-3) 2. Hard Disk Drive in SelectaDock Docking System (HDD-3) 3. Main Card |
| 70 | PCMCIA-2 (Replicator) |
| 90 | CD-ROM Drive |
| 91 | CD-ROM Drive in SelectaDock |
If the problem still remains after replacement of the FRUs, go to 'Undetermined Problems'.
| Symptom/Error | SelectaDock Docking System FRUs |
|---|---|
| Sequence of Actions | |
| Beep sounds continuously. |
1. Security feature group
2. Main card |
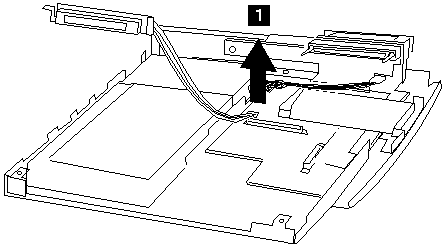
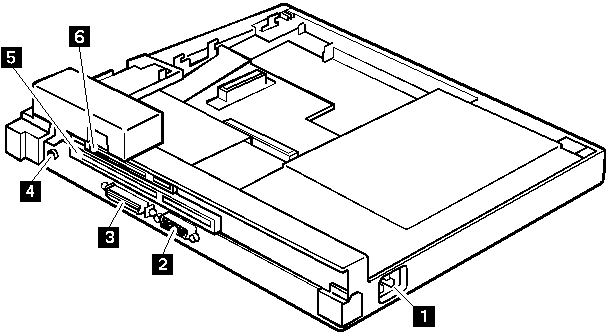
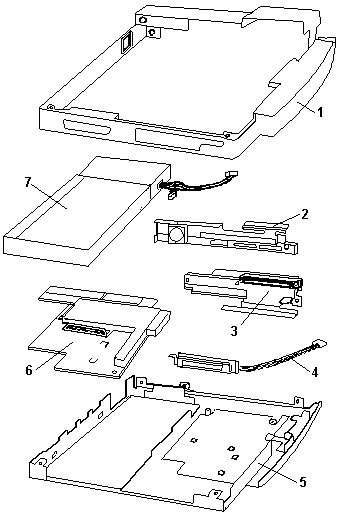
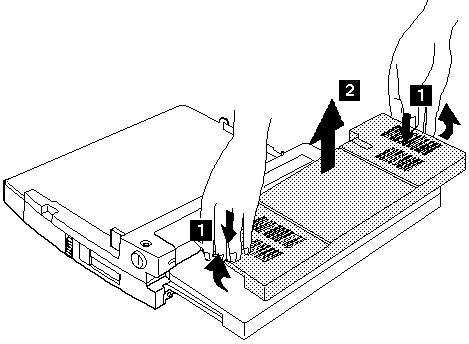
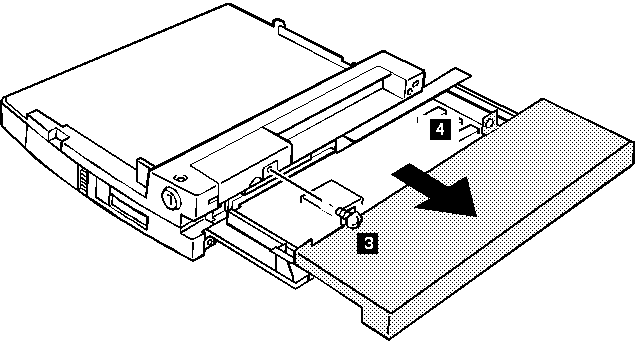
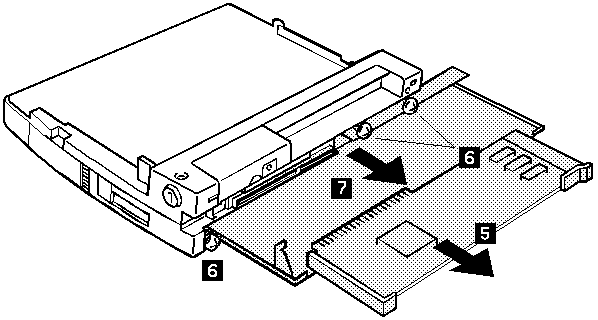
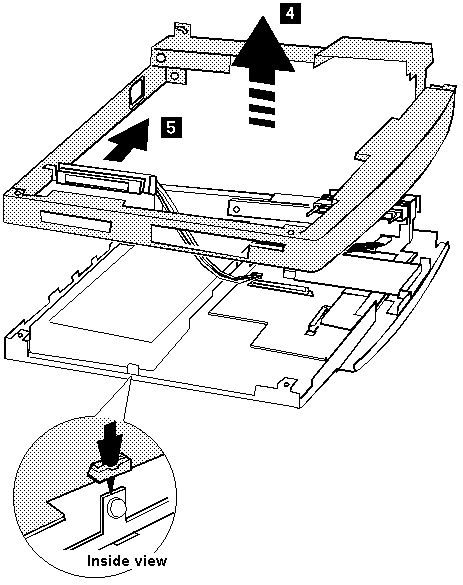
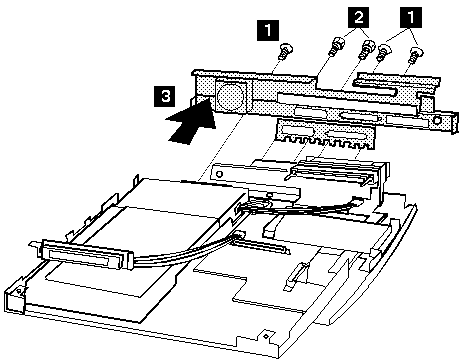
This section contains information on removals and replacements, and locations.

Before removing any FRU, power-off the ThinkPad Dock I and computer, unplug
all power cords from electrical outlets, remove the battery pack, and
then disconnect any interconnecting cables.
The main board, adapters, and circuit boards on the drives are
sensitive to, and can be damaged by,
 electrostatic
discharge. Establish personal grounding
by touching a ground point with one hand before touching these units.
An electrostatic
discharge (ESD) strap must be used to establish
personal grounding.
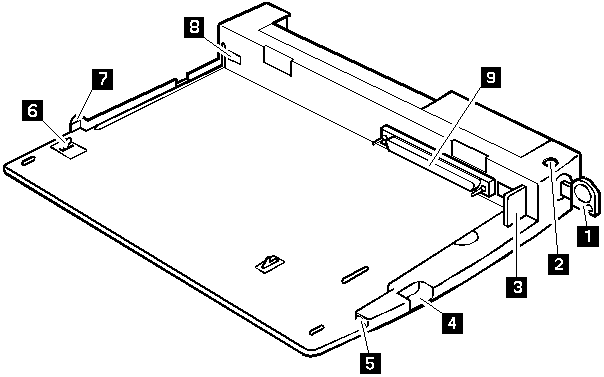
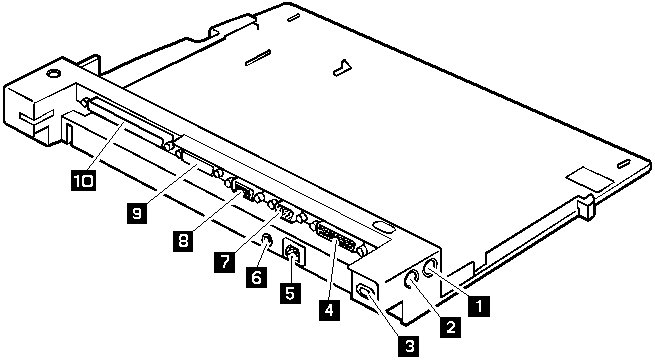
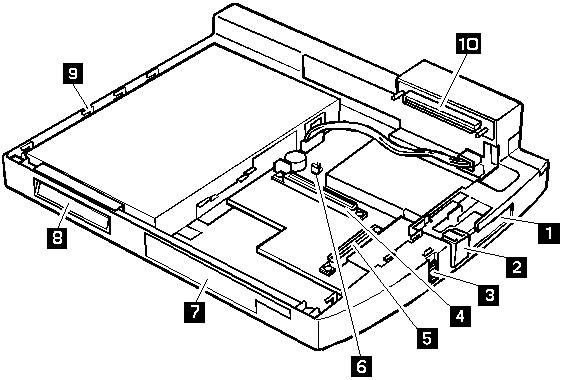
Locations
SelectaDock Base Model I
SelectaDock I
If the power-on indicator is not on and the power supply fan is not turning, check the power cord for continuity and correct installation.
If the power cord is not the problem, either the power supply is defective, or another component is defective causing the power supply to cut off. To verify that the power supply is operating correctly, do the following:
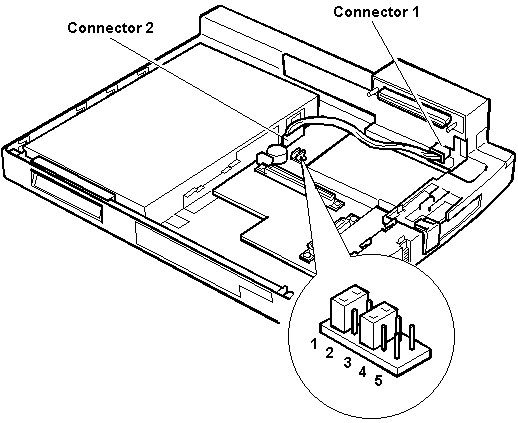
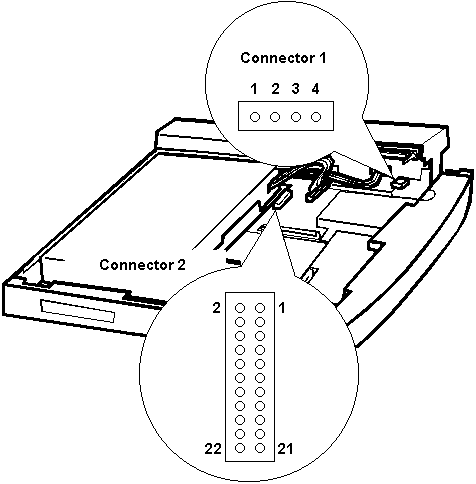
- Connect the power cord.- Check the voltages at **connector 1**.- Disconnect the power cord.- Remove **power supply connector 2** from the main card.- Install jumpers between pins 6 and 8, and pins 1 and 17
**of connector 2**.- Reconnect the power cord.- Check the power supply voltages at **connector 2**.
If the voltage is not correct, replace the power supply.
If any voltages are not correct, replace the power supply. If the problem remains, replace the main card.
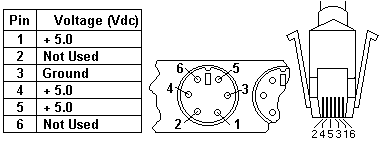
Power Supply Connector 1
| Pin | Signal | Vdc Min. | Vdc Max. |
|---|---|---|---|
| 1 | CVCC | + 19 | + 21 |
| 2 | Ground | - | - |
Power Supply Connector 2
| Pin | Signal | Vdc Min. | Vdc Max. |
|---|---|---|---|
| 1 | -12 volts | -11.4 | -13.2 |
| 3 | -5 volts | -4.53 | -5.5 |
| 5 | +5 volts | +4.75 | +5.25 |
| 7 | SUB 12 | +11.4 | +12.6 |
| 9 | +12 volts | +11.4 | +12.6 |
| 11 - 13 | +3.3 | +3.0 | +3.6 |
| 17 - 19 | +5 | +4.75 | +5.25 |
| Symptom/Error | SelectaDock Docking System FRUs |
|---|---|
| Sequence of Actions | |
| Although the computer is turned off, the fan of the SelectaDock Docking System power supply is running. | 1. The fan is working correctly. To stop the fan, set the key lock to the external left position. |
| The power of SelectaDock Docking System | See 'Undetermined Problems'. |
| cannot be turned off. |

| Step | Length (Quantity) | Memo |
|---|---|---|
| 2 | M 3 x 5 mm (1) | |
| 3 | M 2.6 x 5 mm (1) | |
| 4 | M 2.6 x 8 mm (1) | |
| 5 | M 2.6 x 4 mm (2) |
Note: If the replaced parts did not resolve the problem, put the original parts back in the SelectaDock Docking System. Do not replace non-defective parts.
Test the printer by connecting it to the computer before testing it on the SelectaDock Docking System.
If the printer self-test does not run correctly, the problem is in the printer. Refer to the printer service manual.
If the printer self-test runs correctly, connect a wrap plug on the parallel connector on the rear of SelectaDock Docking System and run the advanced diagnostic tests to determine the failing FRU.
If the advanced diagnostic tests (with the wrap plug connected) did not detect a failure, replace the printer cable.
If the problem is not corrected, do one of the following:
If the printer is attached to the parallel connector of SelectaDock Docking System, replace the main card of SelectaDock Docking System.- If the printer is attached to the parallel connector on the adapter, replace the FRUs in the following order one at a time until the problem is corrected:
NOTE:If the replaced parts did not resolve the problem, put the original parts back in the SelectaDock Docking System. Do not replace non-defective parts.
Note: If the replaced parts did not resolve the problem, put the original parts back in the SelectaDock Docking System. Do not replace non-defective parts.
Note: If the replaced parts did not resolve the problem, put the original parts back in the SelectaDock Docking System. Do not replace non-defective parts.
If the screen is rolling, replace the external display. If the problem is not corrected, replace FRUs in the following order one at a time until the problem is corrected:
NOTE: If the replaced parts did not resolve the problem, put the original parts back in the SelectaDock Docking System. Do not replace non-defective parts.
If the external display is attached to the display adapter:
If the screen is not rolling, do the following to run the display self-test:
Check for the following conditions:
If the external display does not meet these specifications, replace the external display.
If the external display meets these specifications, replace FRUs in the following order one at a time until the problem is corrected.
NOTE: If the replaced parts did not resolve the problem, put the original parts back in the SelectaDock Docking System. Do not replace non-defective parts.
If the external display is attached to the display adapter:
Note:
Note: If the replaced parts did not resolve the problem, put the original parts back in the SelectaDock Docking System. *Do not replace non-defective parts.*
NOTE:
Power-off the computer.- Disconnect the keyboard cable from the external keyboard.- Power-on the computer and check the keyboard cable connector for the following voltages. All voltages have a ±5% voltage tolerance.
- If all voltages are correct, replace the external keyboard.- If the voltages are not correct,
replace the following FRUs one at a time until the
problem is corrected.
   **NOTE:** If the replaced parts did not resolve the problem,
    put the original parts back in the SelectaDock Docking System. ****Do not replace
    non-defective parts.****

   1. Keyboard cable- Main card of SelectaDock Docking System
Use the following procedure to run the keyboard key test.
The green LED on the PC test card lights when the PCMCIA test is running. If the LED does not go on, check that the card is installed correctly by reseating the card. If it still does not light after reseating, try using another slot for the test. If the LED still does not go on and the test fails, replace the FRU shown in the diagnostic error code.
| Symptom/Error | SelectaDock Docking System FRUs |
|---|---|
| Sequence of Actions | |
| One or more keys do not work on the external keyboard, but the SelectaDock Docking System is otherwise functional. | Go to 'External Keyboard'. |
If a device is installed but the icon appears in a gray shade rather than a dark shade on the basic diagnostics screen, the device is defective. Reseat the device connectors. If the symptom remains, replace the device or the system board. If needed, adjust the contrast control to clearly distinguish the shades of the icon.
If a device that is not installed appears in a dark shade (for example, FDD-2 appears in a dark shade when NO second FDD is installed), do the following:
The PCMCIA-1, Parallel, and Serial icons are always displayed in a dark shade because the icons represent subsystems of the system board and not the attachment of the devices.
The FDD-1, HDD-1, or PCMCIA-1 icons represent the first drive in the system configuration for each type of device. Similarly, the HDD-3, FDD-2, or PCMCIA-2 icons represent the second drive, usually attached through a port replicator or an expansion unit. The HDD-2 icon represents the hard disk drive in the UltraBay.
Diagnostic errors are printed on the printer that is attached to parallel port when the error is detected. The error is also logged in the system memory.
Use the following procedure to display the errors.
The error log is not saved when system power is turned off.
If the POST detects an error, a three- to eight-digit error code is displayed.
If the POST detects a memory error in the first 640KB of system memory, all of the first bank memory is de-allocated and the test continues with the second 640KB of the second bank memory. If the total amount of error free memory becomes less than 2MB, a 2XX POST error occurs and the system stops. All of the remaining memory is used as system memory. When the POST memory test has completed, the usable memory size is compared with the configuration data and if a mismatch is detected, a 2XX error code occurs. The user can continue with system operation by pressing Esc, and F1 after restart and call for service at a later time.
The memory sizes that are de-allocated because of the POST process is kept by the hibernation or suspend functions. To test this memory, it must be re-configured as part of the original memory size. The memory re-configuring is done by turning power off and on.
De-allocation support is done only by the POST for memory errors. All unrecoverable memory errors that occur during normal operation cause an interrupt to the operating system.
- Select an item on the screen and follow the instructions that
appear on the screen.
Note: If a SCSI adapter is installed in an PCI adapter card slot, remove it before running the SCSI diagnostic program.
NOTE: If a SCSI adapter is installed in an PCI adapter card slot, remove it before running the SCSI diagnostic program.
If a SCSI controller is found, the computer goes on to initialize the SCSI devices and displays the following.
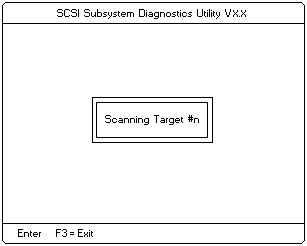
- If the initialization fails, the following screen appears.

- If the initialization ends successfully, the following screen
appears. Select an item.
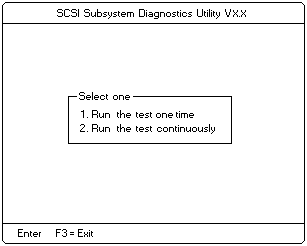
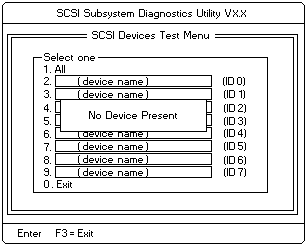
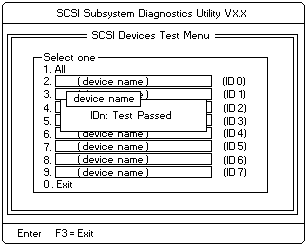
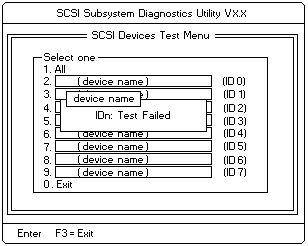
- The **SCSI Devices Test Menu** appears.
Select one of the devices.

The device name may be any of the following:
- SCSI Hard Disk- SCSI Tape Drive- SCSI CD-ROM- SCSI Optical Drive- or No Device
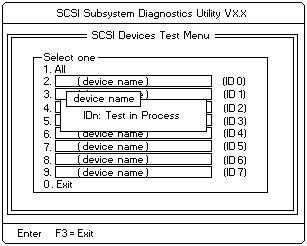
The SelectaDock Docking System SCSI controller appears as ID7 on the screen.- If a SCSI device exists and a test media is required to test
the SCSI device, the following pop-up menu appears
(shows the case of a SCSI tape drive).

- Insert the requested media and wait for approximately 30 seconds
until the media is loaded.- Press any key. If no SCSI devices are found, a pop-up menu appears.
- The test begins and the following pop-up menu appears.
- If the test is successful, the following appears.
- If the test is unsuccessful, the following appears.
| Symptom/Error | SelectaDock Docking System FRUs |
|---|---|
| Sequence of Actions | |
| Power-good light does not turn on, fan does not run, and the computer is not functional. | See 'Undetermined Problems' |
| Computer is functional and the fan runs, but the power on indicator does not turn on. |
1. Check the connector of LCD Group
2. Main Card 3. Go to 'Power Supply'. |
| LCD (SelectaDock Docking System) for the hard disk drive stays on. | 1. 2.5-inch hard disk drive in the UltraBay of the SelectaDock Docking System |
| LCD (SelectaDock Docking System) for the hard disk drive is not working, but the SelectaDock Docking System is functional. |
1. Check the connector of LCD Group
2. LCD Circuit Board Group 3. Main card |
| Symptom/Error | SelectaDock Docking System FRUs |
|---|---|
| Sequence of Actions | |
| External display screen changes colors. | Go to 'External Display' |
Note: The HDD-3 icon indicates the a. Install the second 2.5-inch ThinkPad hard disk drive hard disk drive on installed in SelectaDock the computer. Docking System. b. Remove the hard disk password.
| Symptom/Error | SelectaDock Docking System FRUs |
|---|---|
| Sequence of Actions | |
| Computer does not work, the power-on indicator does not turn on, but the fan runs. | See 'Undetermined Problems' |
| Program-load error during remote IPL from the file servicer. | Network Adapter |
| Intermittent failures. | Do the loop test. See 'How to Run the Diagnostics' |
| The HDD-3 is not recognized and no error codes appear on the screen. (The password of the HDD-3 is still set.) | 1. Remove the hard disk password for the ThinkPad hard disk as follows: |
| NOTE: The HDD-3 icon indicates the 2.5-inch ThinkPad hard disk drive installed in SelectaDock Docking System. | a. Install the second hard disk drive on the computer. b. Remove the hard disk password. |
Note: Removing an adapter or device may cause configuration errors. Ignore error code 174.
Note: If a replaced part did not resolve the problem, put the original part back in the SelectaDock Docking System. Do not replace non-defective parts.
Use the following procedure when the diagnostic tests do not identify the failing adapter or device.
Check that all cables, wires, and connectors are connected so that they do not cause a short circuit. If any problems are found, reconnect or replace them.
Check the power supply for correct operation (see 'Power Supply'). If the power supply is operating correctly, return here and continue with the following procedures.
Power-off the computer.- Remove or disconnect one at a time the following adapters or devices from SelectaDock Docking System. (Do not isolate adapters or devices that are known to be good.)
**NOTE:** Removing an adapter or device may cause configuration errors.
 Ignore error code 174.

- SCSI device.- Hard disk drive.
Power-on the system and check if the problem has changed.- If the symptom remains, repeat Steps 1 through 3 until you find the failing adapter or device, or until all adapters or devices have been removed.- If all adapters or devices have been removed and the problem remains, replace the following SelectaDock Docking System FRUs one at a time.
NOTE: If a replaced part did not resolve the problem, put the original part back in the SelectaDock Docking System. Do not replace non-defective parts.
If the problem goes away when you remove an adapter, but replacing the adapter does not correct the problem, replace the main card of SelectaDock Docking System.

Note: If the following symptoms are present, they might indicate damage caused by non-warranted activity:
Before you go to the checkout guide, be sure to read this section.
Important NOTEs:
How to Use Error Messages
Use the error codes displayed on the screen to diagnose failures. If more than one error code is displayed, begin the diagnosis with the first error code. The cause of the first error code can result in false error codes being displayed. If no error code is displayed, see if the error symptom is listed in the 'Symptom-to-FRU Index'
How to Diagnose Multiple FRUs
When the adapter or device has more than one FRU, the error code could be caused by either FRU. Before replacing multiple FRUs, try removing or exchanging each FRU, one by one in the designated sequence, to see if the symptoms change.
What to Do First
The servicer must include the following in the parts exchange form or part return form that is attached to the returned FRU.
Before servicing with the computer, determine if the warranty applies by referring to the following:
Warranty NOTE: During the warranty period, the customer may be responsible for repair costs if the computer damage was caused by misuse, accident, modification, unsuitable physical or operating environment, or improper maintenance by the customer. The following list provides some common items that are not covered under warranty and some symptoms that might indicate the system was subjected to stresses beyond normal use:
The following is not covered under warranty:
NOTE: If the following symptoms are present, they might indicate damage caused by non-warranted activity:
In this manual, SelectaDock Docking System means that SelectaDock Base Model I and SelectaDock I together when docked as one unit.
            SelectaDock Docking System for service,
            use a computer that works correctly with SelectaDock Docking System.
If an error is detected by the diagnostic tests, a three digits device ID is displayed. The device ID indicates suspected device.
Icon Device ID Suspected Device
----------------------------------------------------------------------
                     001            System Board
                     003            Keyboard
                     007            Math Coprocessor
                     086            Pointing Device
 ----------------------------------------------------------------------              System Board

                     001            System Board
                     003            Keyboard
                     007            Math Coprocessor
                     086            Pointing Device
 ----------------------------------------------------------------------              Keyboard

                     001            System Board
                     003            Keyboard
                     007            Math Coprocessor
                     086            Pointing Device
 ----------------------------------------------------------------------              Math Coprocessor

                     001            System Board
                     003            Keyboard
                     007            Math Coprocessor
                     086            Pointing Device
 ----------------------------------------------------------------------              Pointing Device
 ----------------------------------------------------------------------

002 Memory
Memory
----------------------------------------------------------------------
                     050            Display
                     051            Enhanced Video
                     052            MPEG
 ----------------------------------------------------------------------              Display

                     050            Display
                     051            Enhanced Video
                     052            MPEG
 ----------------------------------------------------------------------              Enhanced Video

                     050            Display
                     051            Enhanced Video
                     052            MPEG
 ----------------------------------------------------------------------              MPEG
 ----------------------------------------------------------------------

017 Hard Disk Drive
Hard Disk Drive
----------------------------------------------------------------------

151 Hard Disk in UltraBay
----------------------------------------------------------------------

067 External Hard Disk Drive
External Hard Disk Drive
----------------------------------------------------------------------

006 Diskette Drive
Diskette Drive
----------------------------------------------------------------------

066 External Diskette Drive
External Diskette Drive
----------------------------------------------------------------------

080 PCMCIA
PCMCIA
----------------------------------------------------------------------

088 External PCMCIA
External PCMCIA
----------------------------------------------------------------------

009 Parallel
Parallel
----------------------------------------------------------------------

011, 012 Serial
,
011, 012 Serial
Serial
----------------------------------------------------------------------

113 DSP
----------------------------------------------------------------------

215 CD-ROM
----------------------------------------------------------------------

216 External CD-ROM
----------------------------------------------------------------------

103 IR
----------------------------------------------------------------------

150 Audio (ESS)
Rear Panel
Option Card Cover (If installed)
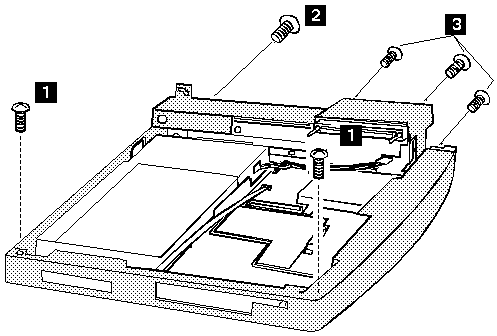
| Step | Length (Quantity) | Memo |
|---|---|---|
| 1 | M 2.6 x 5 mm (2) | Self tap, Black |
| 2 | M 2.6 x 5 mm (1) | Self tap |
| 3 | M 2.6 x 8 mm (3) | Black |
| Step | Length (Quantity) | Memo |
|---|---|---|
| 1 | M 2.6 x 5 mm (3) | Self tap |
| 2 | M 2.6 x 5 mm (2) | Self tap |